
Emergency Mode
|
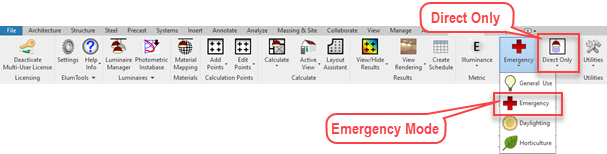
ElumTools contains a separate calculation mode designed for emergency lighting only. It can be enabled and disabled from the Mode switch on the ribbon toolbar by selecting Emergency Mode from the drop down menu.
When Emergency Mode is enabled, ElumTools will perform calculations using the Direct Only calculation method automatically and you will see the calculation mode icon change to Direct Only on the toolbar. Many emergency lighting calculation standards specify the consideration of only direct light. Should you need to compute emergency lighting results using interreflected light as well, you can simply change the calculation mode to Global Illumination. This will remove the automatic behavior of switching to Direct Only mode. It can be reinstated by pulling down the calculation mode menu and selecting the Automatic setting.
Emergency lighting calculations in ElumTools will consider only those luminaires that are designated for emergency use by instance or type (Luminaire Manager). These calculation results are visible in the visualization viewer, the calculation points dialogs and from the View/Hide Results commands.
ElumTools calculation modes are view dependent. This means you can display your Emergency mode calculations in one view (or set of views), and your General Use calculations in another. You may toggle back and forth between the display of General Use and Emergency calculation results by enabling or disabling the Emergency Mode on the ribbon.
When ElumTools is set in Emergency Mode, the Emergency Mode icon will appear on the right end of the ribbon and the calculation mode icon will show Direct Only as shown in the toolbar capture above. Additionally, a large tool tip will appear when a calculation command is selected (for example: Calculate Room Workplane) to remind you that Emergency Mode is active.
|
Best practices for using Emergency Mode will depend on your preferred workflow within Revit. When developing this capability we tried to account for a variety of different emergency lighting scenarios, in some cases using different workflows.
Additional information can be found in the description of the Emergency Tab in Luminaire Manager.
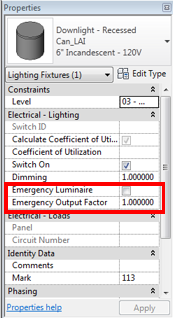
Designating emergency luminaires by instance
Designating luminaires by type for dual use
|
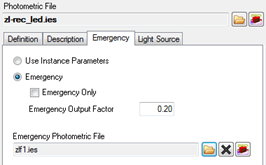
A second workflow allows emergency use luminaires to be designated by type. Using this procedure, all control is handled in Luminaire Manager and the previously discussed instance parameters are ignored for luminaries of that type.
With the photometric type selected in Luminaire Manager, from the Emergency tab select "Emergency" (the default is "Use Instance Parameters"). By making this selection, all instances of this luminaire type will be designated for emergency use, but will also be included in the general use calculations. If you prefer to designate only selected instances of the type as emergency, it is best practice to duplicate the type and rename the duplicate with an emergency identifier.
An "Emergency Output Factor" can be assigned to account for light loss factors and possible dimming. It is also possible to assign a secondary photometric file should the luminaire type have an alternative source when used for emergency operation.
|
|
Designating luminaires by type for emergency use only
